Dust Boot Magnetic CnC Acrylic Cambam MechMate Updated** (Prototype #1)
(UPDATED 02.24.2015 File Download DXF format Sorry it took me so long to publish)
(DOWNLOAD HERE)
All I submit my prelim design for a dust boot.
Machine: MechMate 4×8 CnC router
Router: Milwaukee
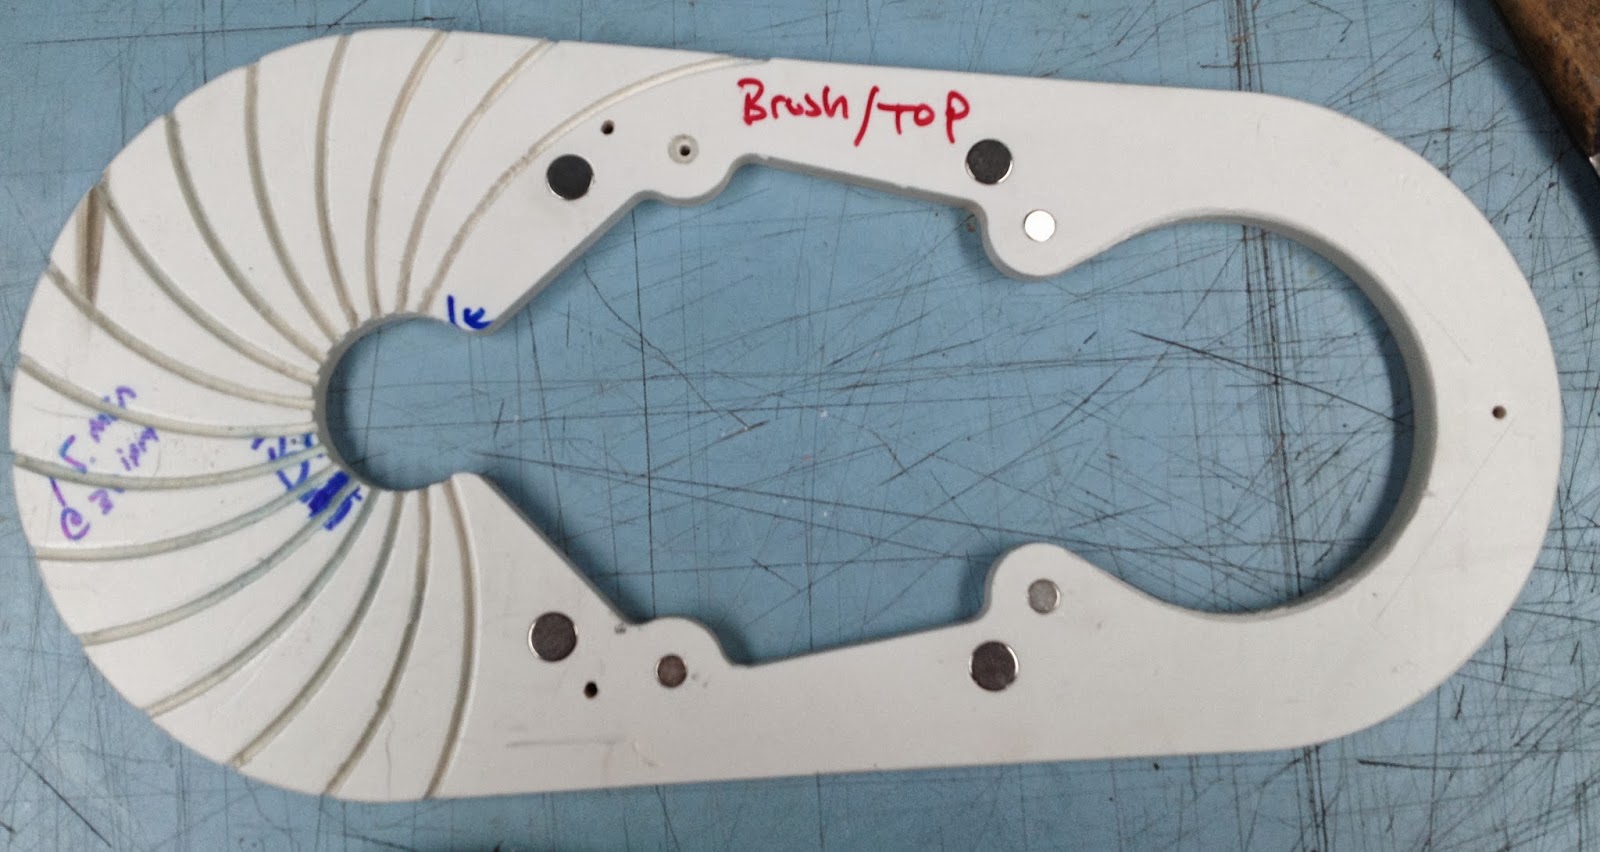
Boot Components:
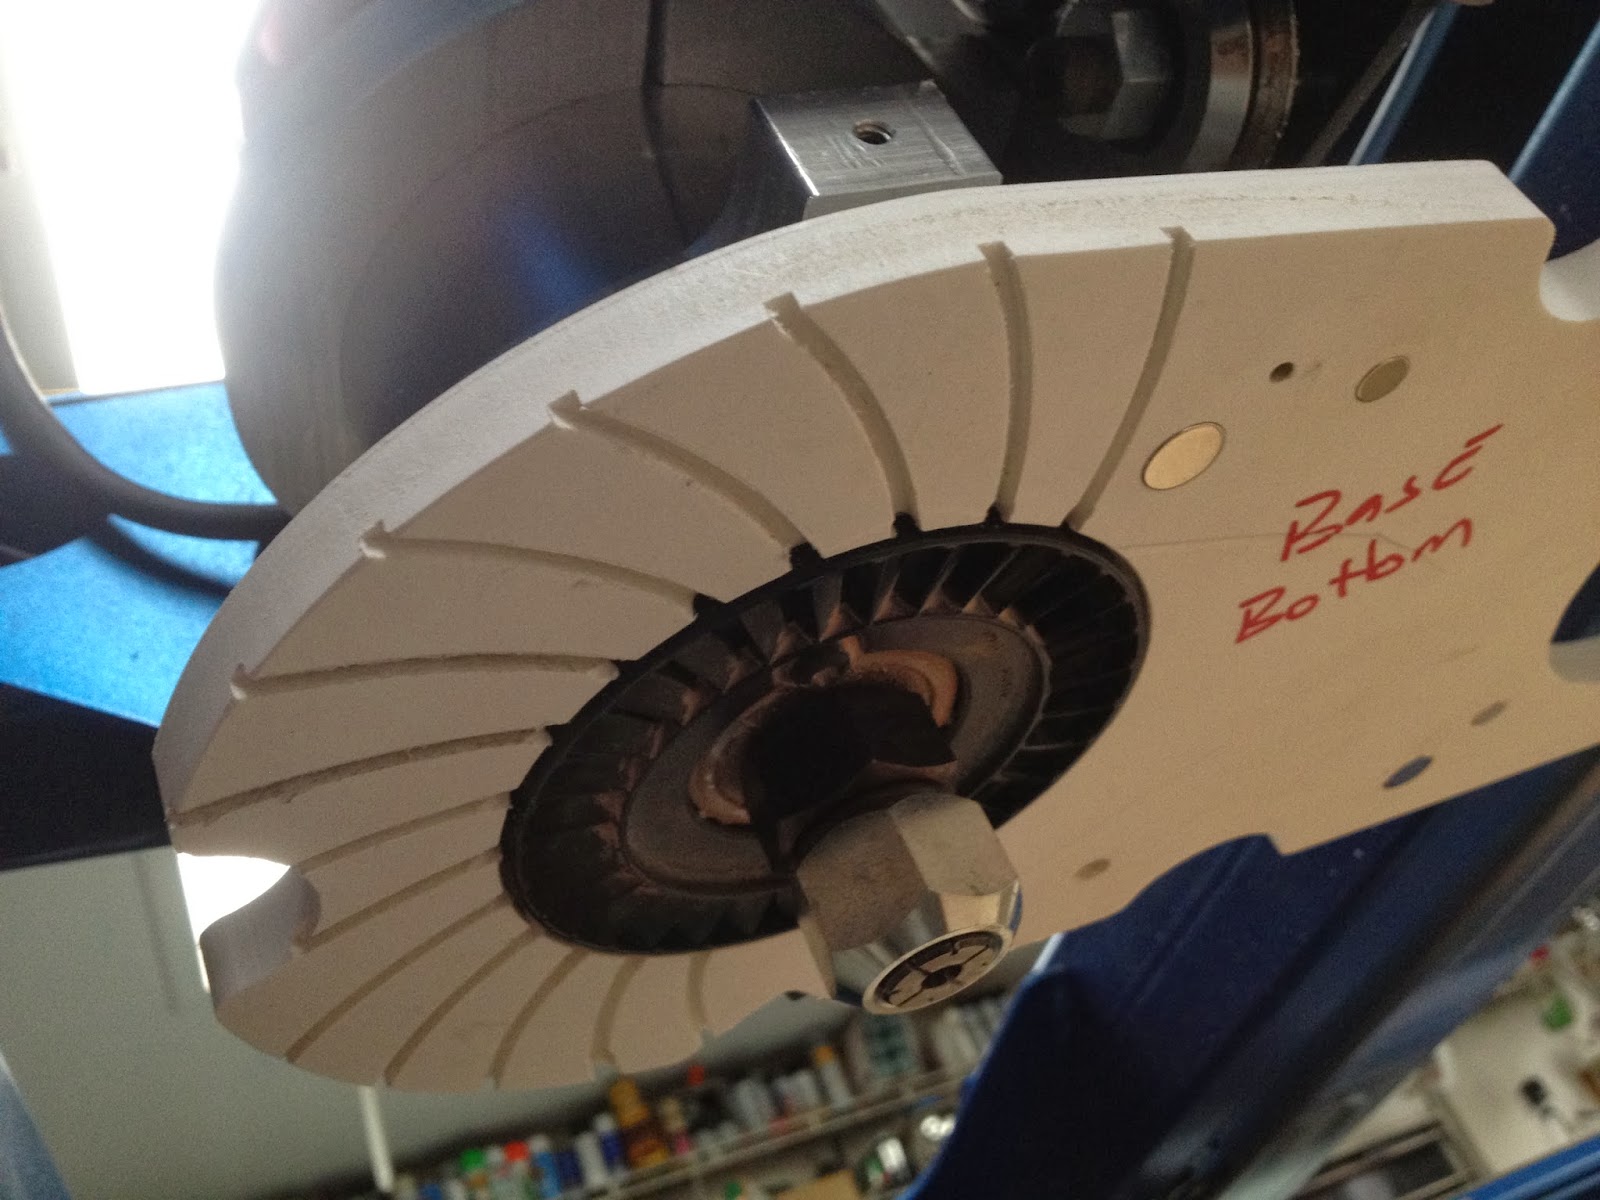
Cast Acrylic 0.5″ 2 plates
Brush: 3″ with a 1″ backing
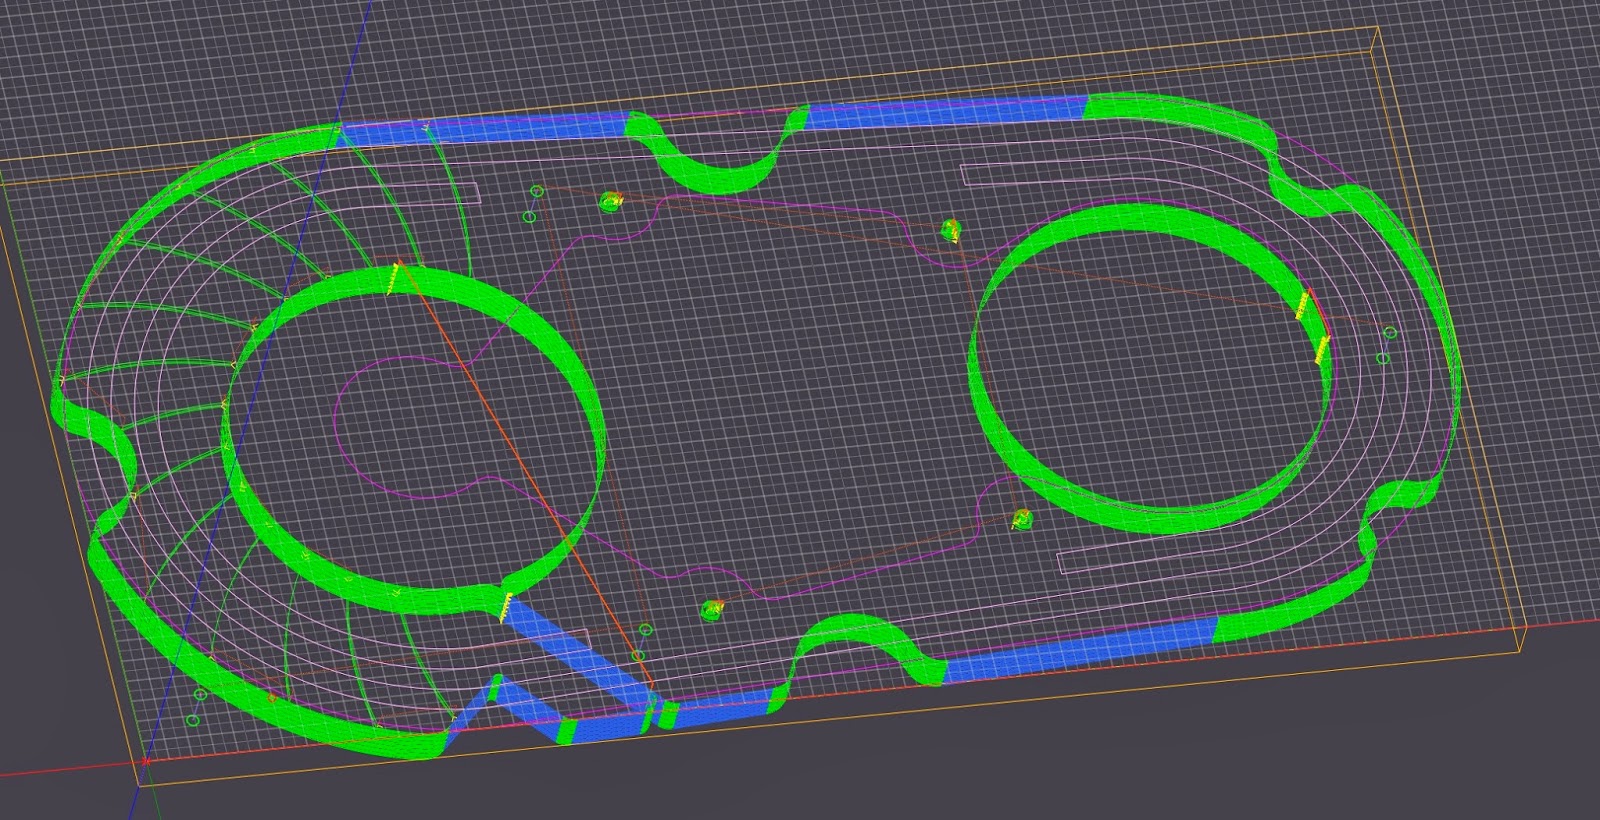
The view is from CamBam.
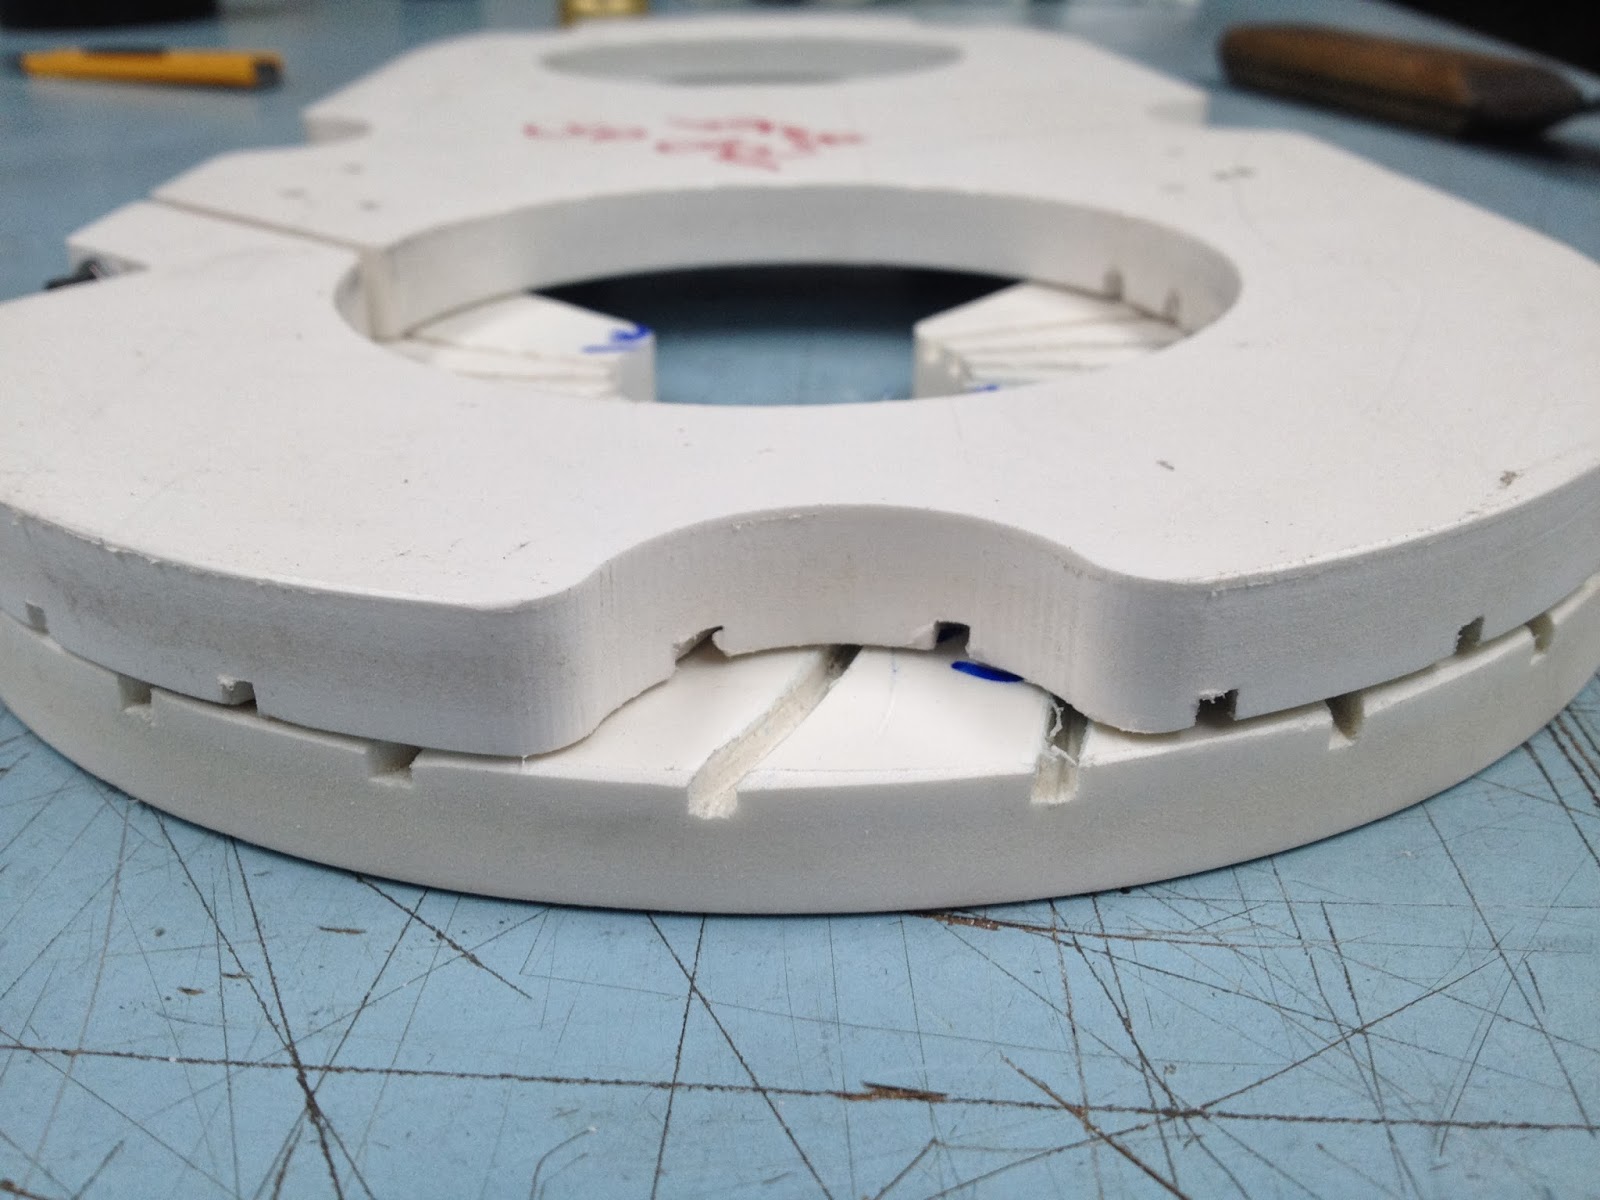
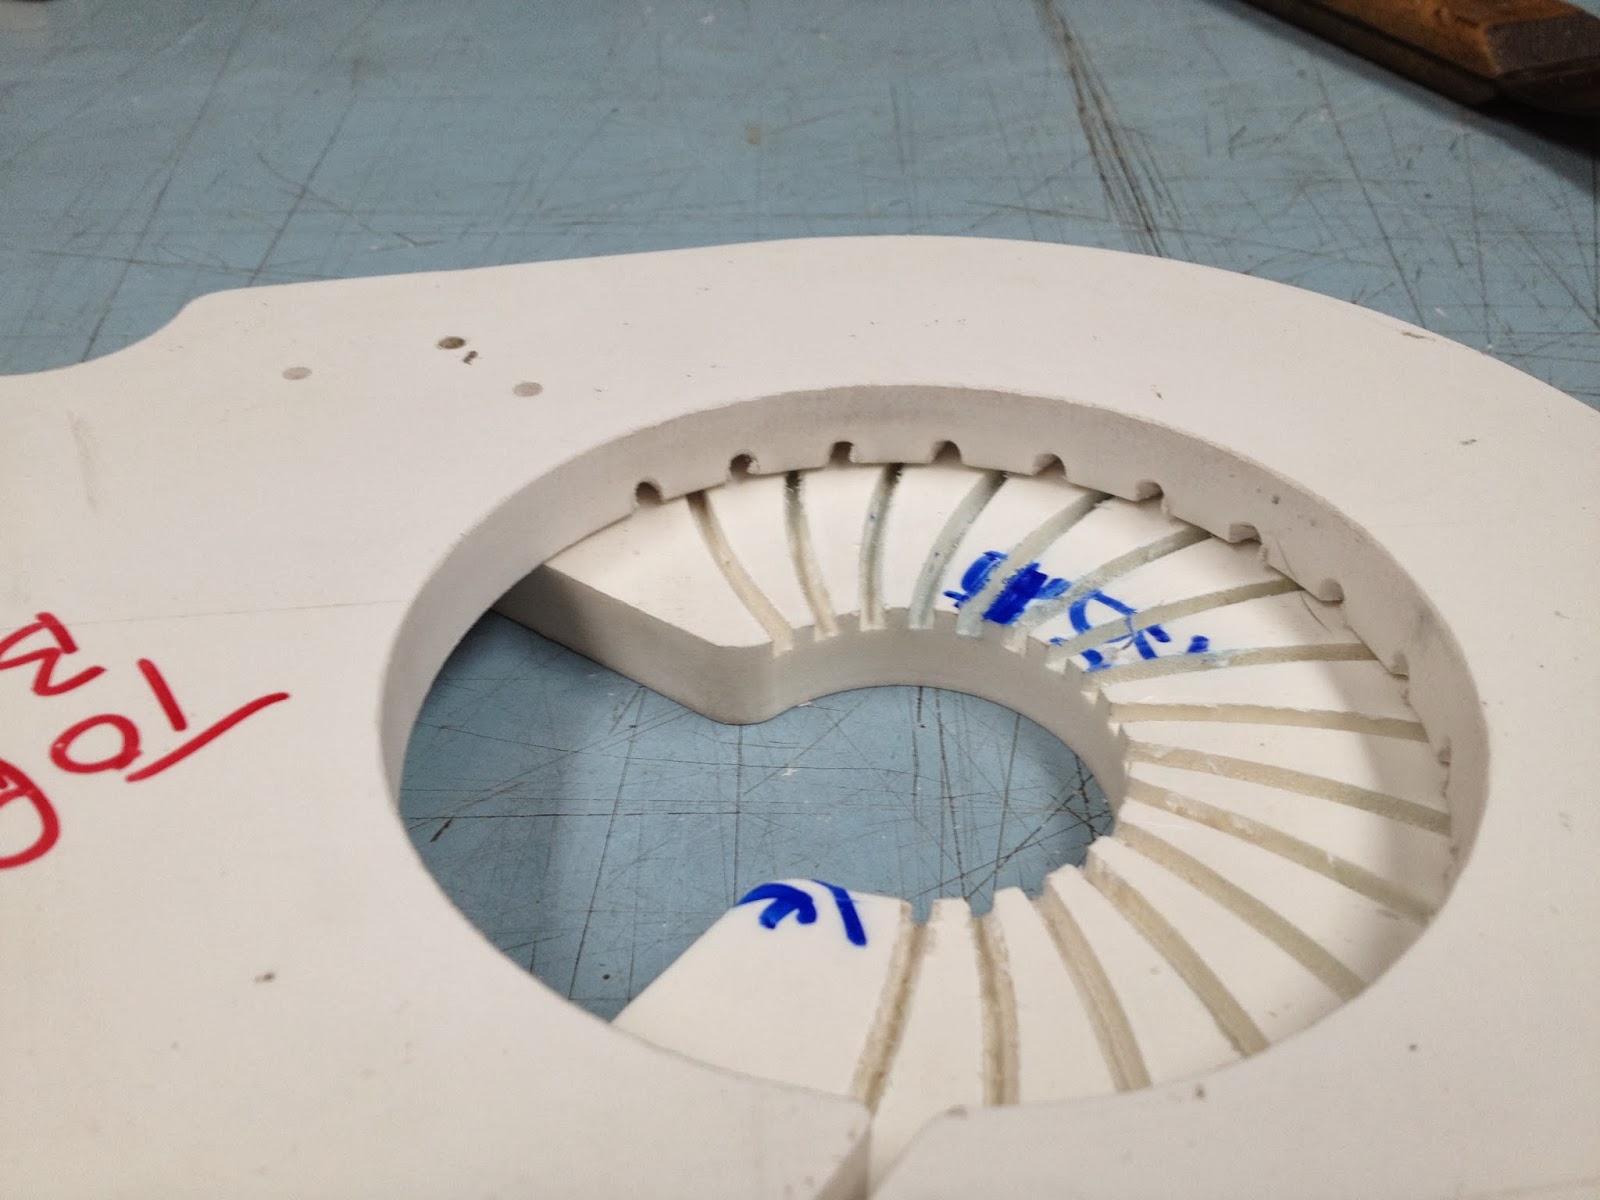
And Consist of 2 parts
The main part will attach to the router. Both parts have 1/8 (.0125) grooves for Router air control
Both spiraled to help with the exhaust generated by the router.
The Brush portion is detachable via Rare earth magnets. and 2 alignment pins
pretty simple.

it will consist of 5 milling operations.

(1) Drilling all the alignment pin holes. in the first part the base.
(2) Drilling all the alignment pin holes. in the second part the brush shoe.
(3) Drilling all the alignment pin holes. in the platen
(4) Milling out all the under side of the base component.
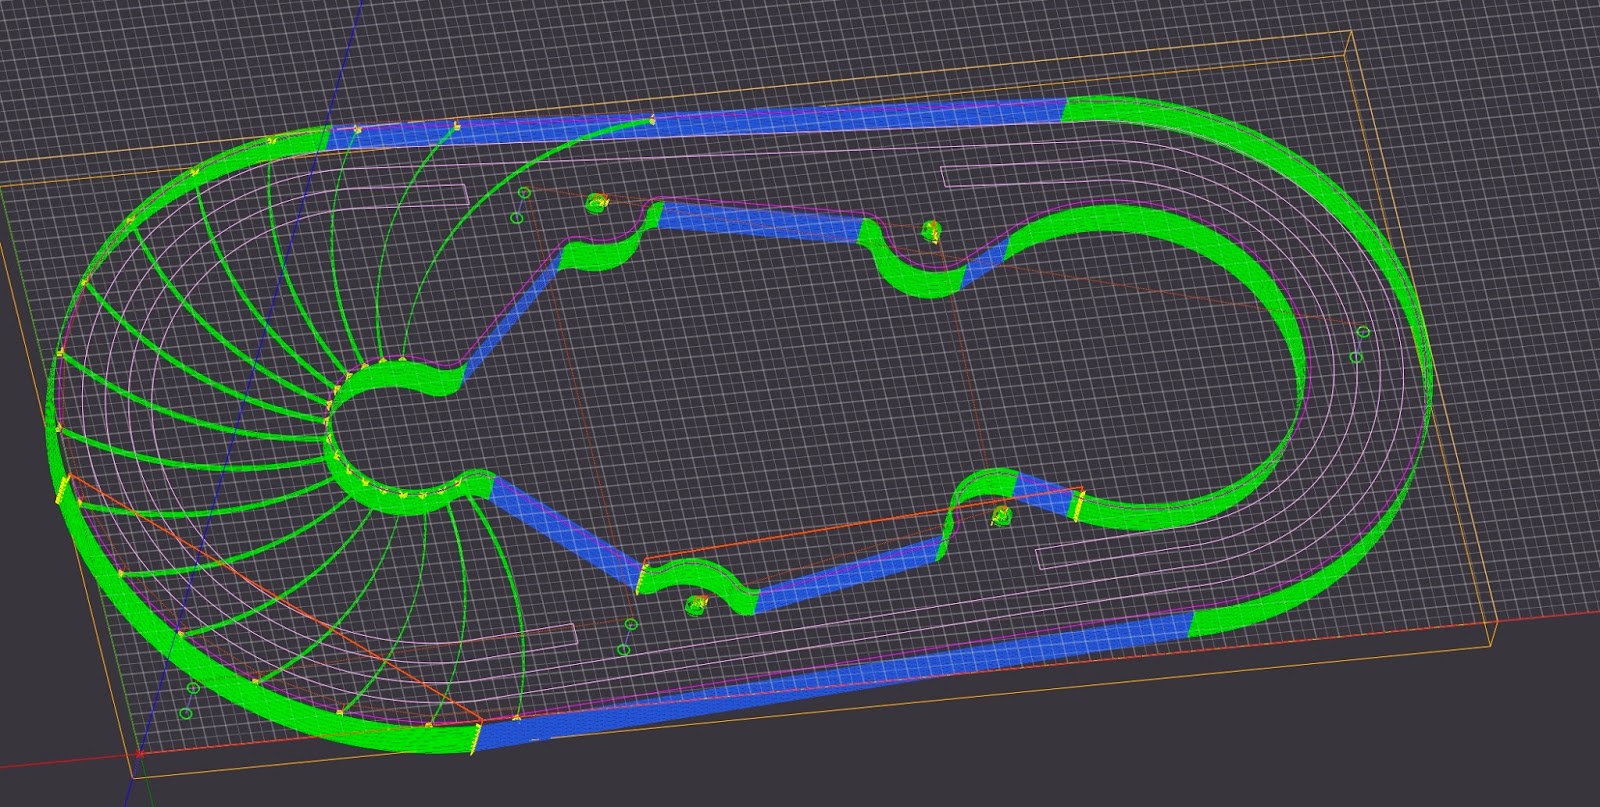
(5) Milling out all the top side of the Brush boot
(Flip over brush boot portion)

(6) Milling out the Brush grooves.
Drill the hole for the clamp for the main portion to the router. Drill and tap. No nuts. 8-32
Insert the magnets orient them N-S etc.. So the boot will only attach properly.
Insert the brush material. both brushes for all brushes. 3″& 1″ , 2″ & 1″ and then the last one 1″ & 1″
…
It’s late I thought I would have them cut by now. But I spent most of the day screwing with the Drawings and g-code. Note: Last second addition Ill mill out a small groove for LED lighting.
this may stall my prototypes. We’ll see
Stay tuned for pics. if all is successful I’ll cut them from the acrylic.
-S
Notes:
I have all the drawing in DXF and Cambam format Im pretty sure this could be re scaled or modified in many ways for those of you who want the big part done. Im glad to supply my files. heck even the G-Code. (Beware the gcode is written for my setup)
********************(UPDATED 01/12/2014 BELOW)*******************
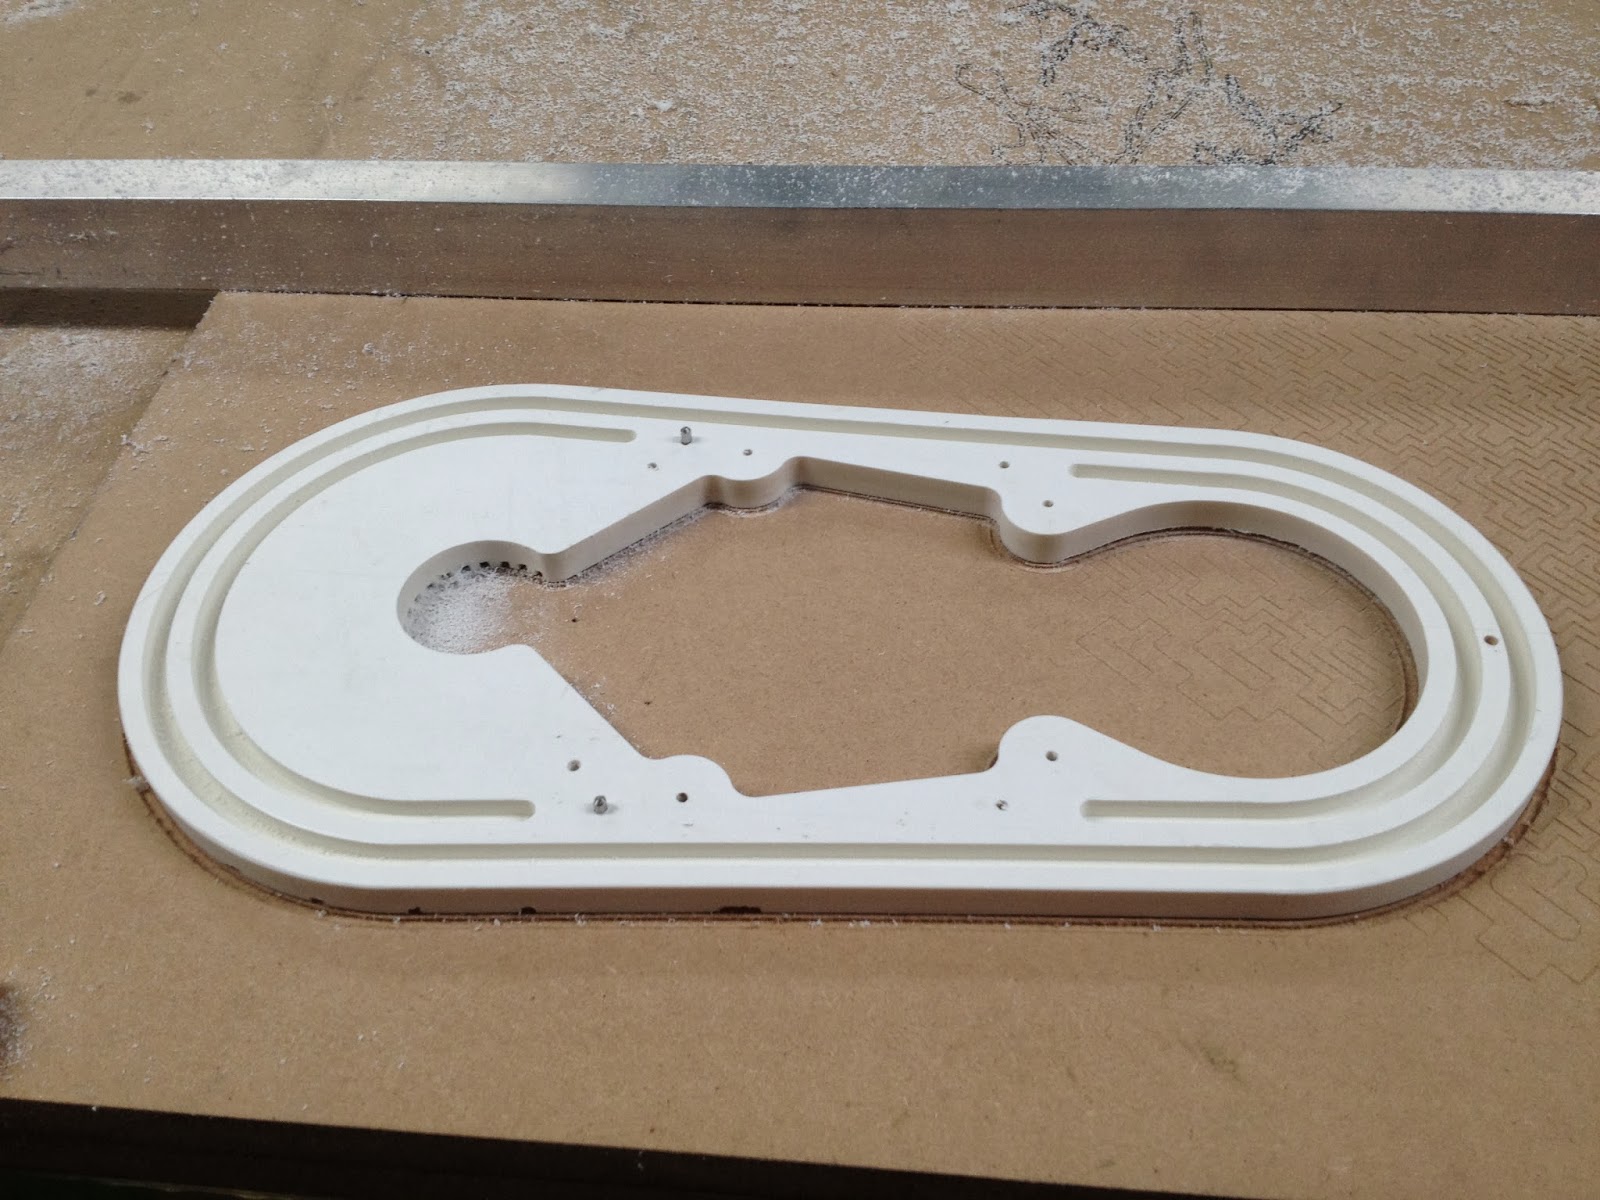
I cut the prototype out of PVC its cheaper and easy to cut..
Discoverys.
The smaller Harbor Freight magnets are not strong enough imho. (perhaps if I used more of them??)
So I went with some Magnets I found at Norther Tool Same style “Super Magnets #07046″ 6 for 5.99
So I got 2 packs. they worked like a charm…
Also I added a 1/8 hole on the back side of the magnets for future removal. (hey every penny counts!)
On the brush part I also decide Ill complete the circle as a lot of air is escaping into the vacuum chamber. So Ill close it off and add more air diverters. they work nicely. I plan on adding some relief holes towards the outside of the diverters all the way thru to the vacuum chamber. (Ill add drawings)
Also, Their is no brush installed as I have yet to receive them but they should be here this week. for a final fit in regards to the brush mounting area.
As for the clamp design I plan on making it congruent with the air diverters so it will be a similar curve. so instead of a straight line… it’ll match the rest.
When I make the final modifications. I’ll most likely re cut from PVC then go to the Acrylic.
Oh I forgot to mention Some how i’d like to add led’s but I have not decided how Im going to accomplish that yet. the Base plate is .5″ and then when the brush plate mount to it its 1” over all.
The led’s would be mounted to the base plate. and then have to shine thru the brush plate….
sound like lots of room for failed light. As far as the wiring that part should be very simple.
But in the event I go with em Ill do my best to include the led wiring info.


More to come….
Version 3… Leds embedded.

*********************************************
Update: got the Brush material…(Vendor 1 and 2 ) Not happy with one of the order’s and the other one i’m happy with. I just did not get enough. . 🙁 So… re order… Company MemTech. Part numbers 3″413197 1″413087
this brush material has a Metal framed crimped on.very nice stuff but then theirs the bending portion.
**************************************************
Update: 01.20.14
Brush material (Vendor # 3) arrived. Wow its nice….
Still waiting on Neodymium magnets should be here this week.
I’d like to stagger the magnets so it’s virtually impossible to place the boot wrong.
Once I get them I can revisit the actual hole sizes and then go to work on what should be the last proto- type. Note on the magnets. I ordered an assortment but these are what they will look like,

Hi, interesting design. Looking forward to seeing how it works out. Do you mind me asking what you paid for the strip brushes?
Best of luck!
125.00 delivered. should be enough to last for 3 complete sets so 9 in total.
Averages out to about 14.00 per shoe/boot. If I recall I think they have a 50.00 minimum. thats easy to reach. I priced 4 different companies. some have mins some do not. they all have similar but not the same brush designs. For my application. the answer is Sealeze. (no offense to the other companies. as they were all very nice to deal with)
**** Update Just looked at my receipt… 122.00 pre shipping.*****
They like to use UPS and I prefer Fed Ex. So, at my request they used my Fed Ex account.
Can I get a copy of your cam am files for this project?
@Bruce, Sure you can. Cam as in Cambam? or my Cad file.
each has its merits. Shoot me your email and Ill send it em to you.
If you cant find my email adders its mail4sam@gmail.com.
Nice work. Looking forward to seeing some videos if possible.
Hi I'm CRP2448 CNC router with Makita rf1101 would you share your files so I can use it on my CNC ? Thank you my email is mikeem@gmail.com
I love your design but my curiosity is more so the brush and vendor you chose to use. please elaborate a little more on that if you don't mind
Hi,
My CNC is Shapeoko and milling tools is KRESS 800 FME.Is possibility send to me DXF file or
buy from you.
@DT: Im glad to send. Ill send this am. to the email you provided. all I ask is. If you do something with it. please publish if possible or leave info. thanks!
Nice design. I like to make one for my CRP 2x 4 setup which i am just finishing. Can you please share your DXF file ?
Very nice design.I am into building .CNC’s on my 5th one now would like to try out your Bush Boot Design on my latest build.Can You send me the DXF or if you have them in Autocad files would like to try it out ! Thanks
Love the design, could I get a copy of your dxf and Cambam files?
I would love to have a copy of the dxf files for the dust shoe – keep up the great work!
hi, is see your great design idea… thas looks very professional… how much you want for dxf files..
i need it for an 80mm HF Spindle from mechatron… thx a lot
Marcell,
I posted a link to the Cad File. No Charge. All I can ask for if pay it forward! Hope it helps.
greeeeeat design…thank you for posting the dxf
Hi My name is Rick ,I like your dust shoe, would it be posible to get a copy of your dxf files for the shoe to put on my machine that I just finished up, been working on it almost two years, all that is missing is the dust collection.Thanks Rick rickyv@cox.net
Rick, Dl Link sent! would love to see your completed dust shoe too. -S
nice well thought out design, if possible I would like to jump on the band wagon and request your files. BTW I am from Covina CA also
Terry, Sorry for the long overdue reply. But pwd sent. so you can Dl files. 🙂 Sam
Design looks great. Please send the files. I have a Maverick 3×5 with ATC, so I may have to make some modifications….