Graingers Oscillating fan "Broken Gear"
Well it seems after 30 years of service my oscillating fan decided to not “oscillate”
I, like most things. Proceeded to take it apart to see what the problem was.
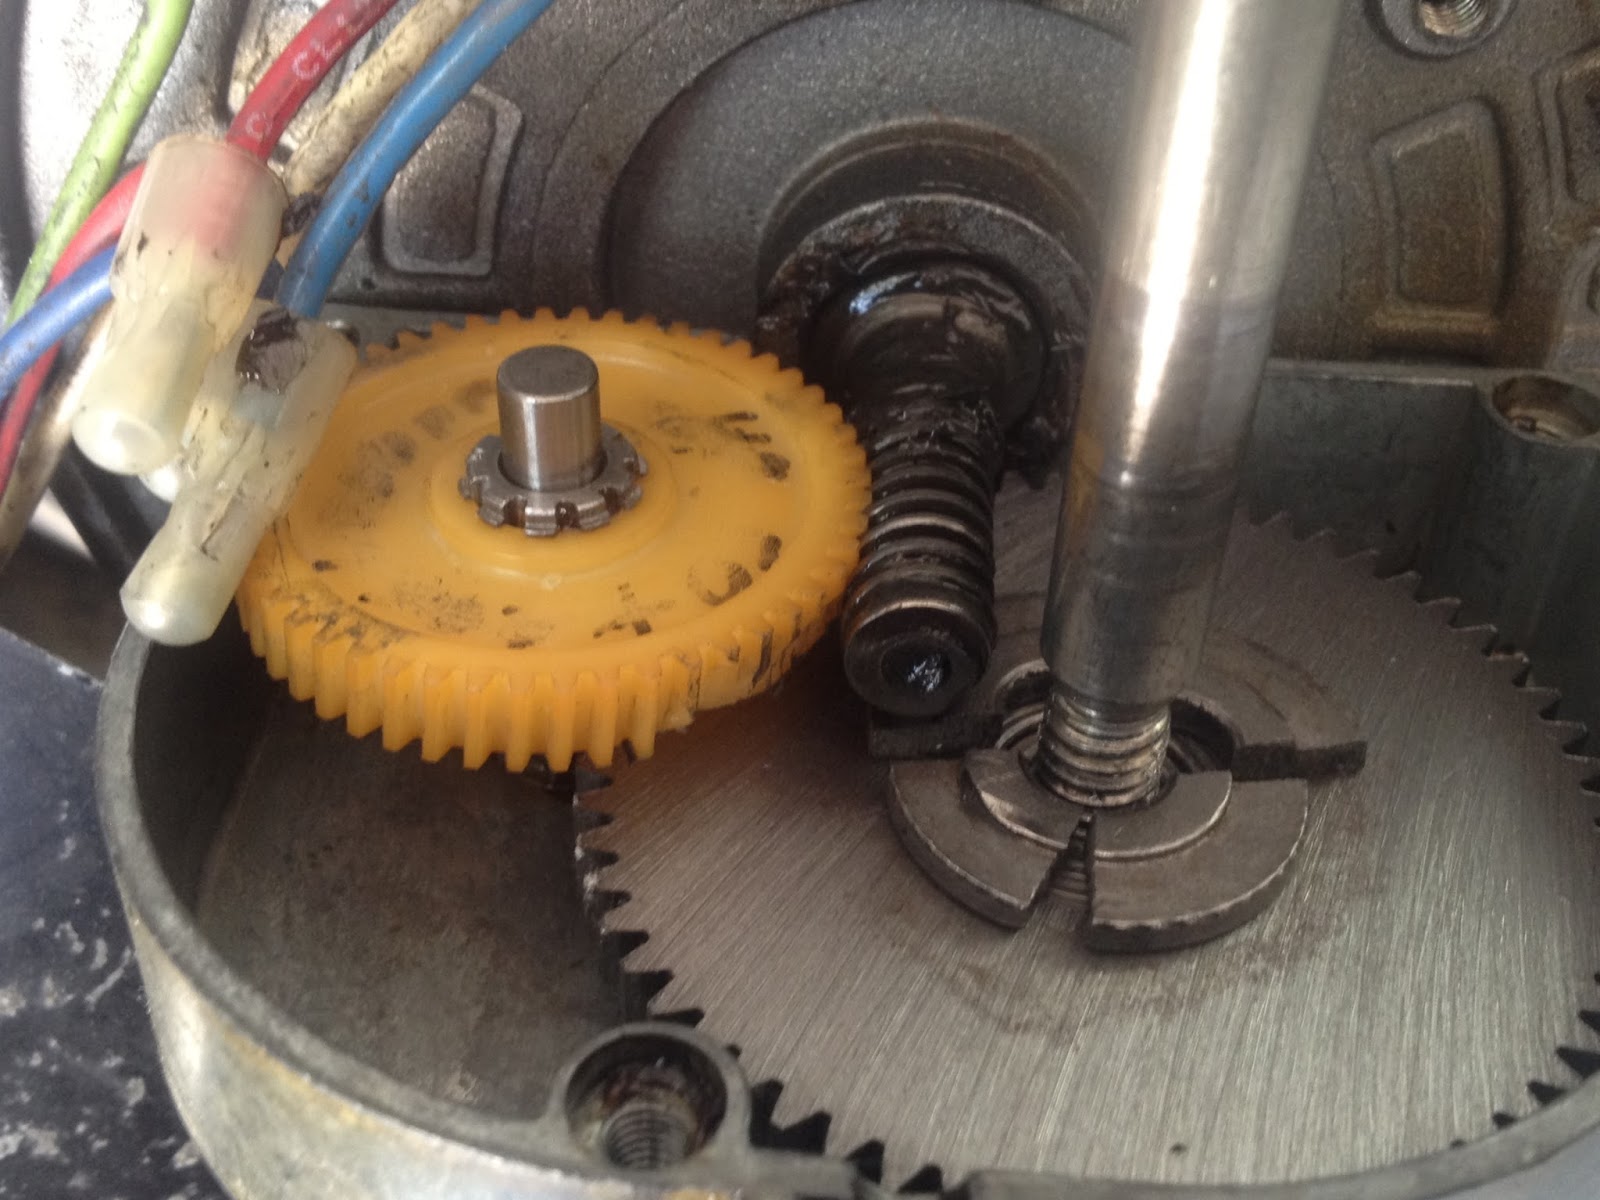
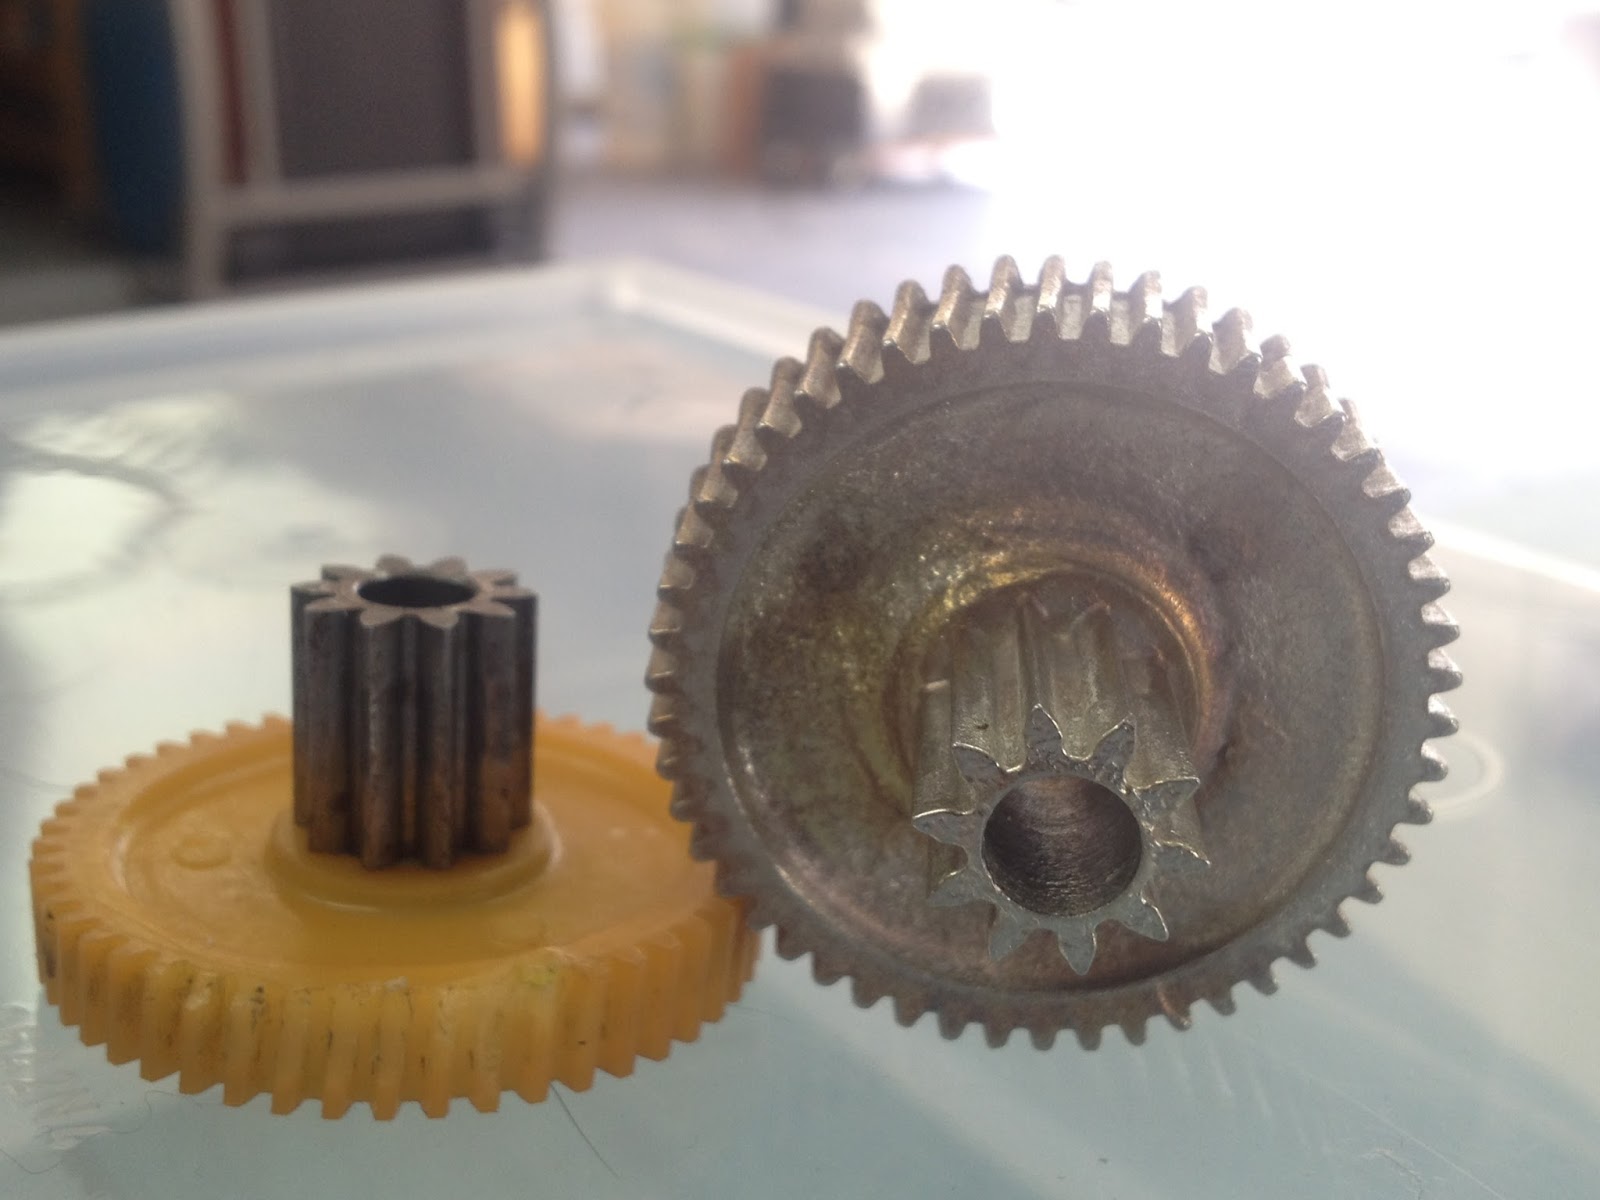
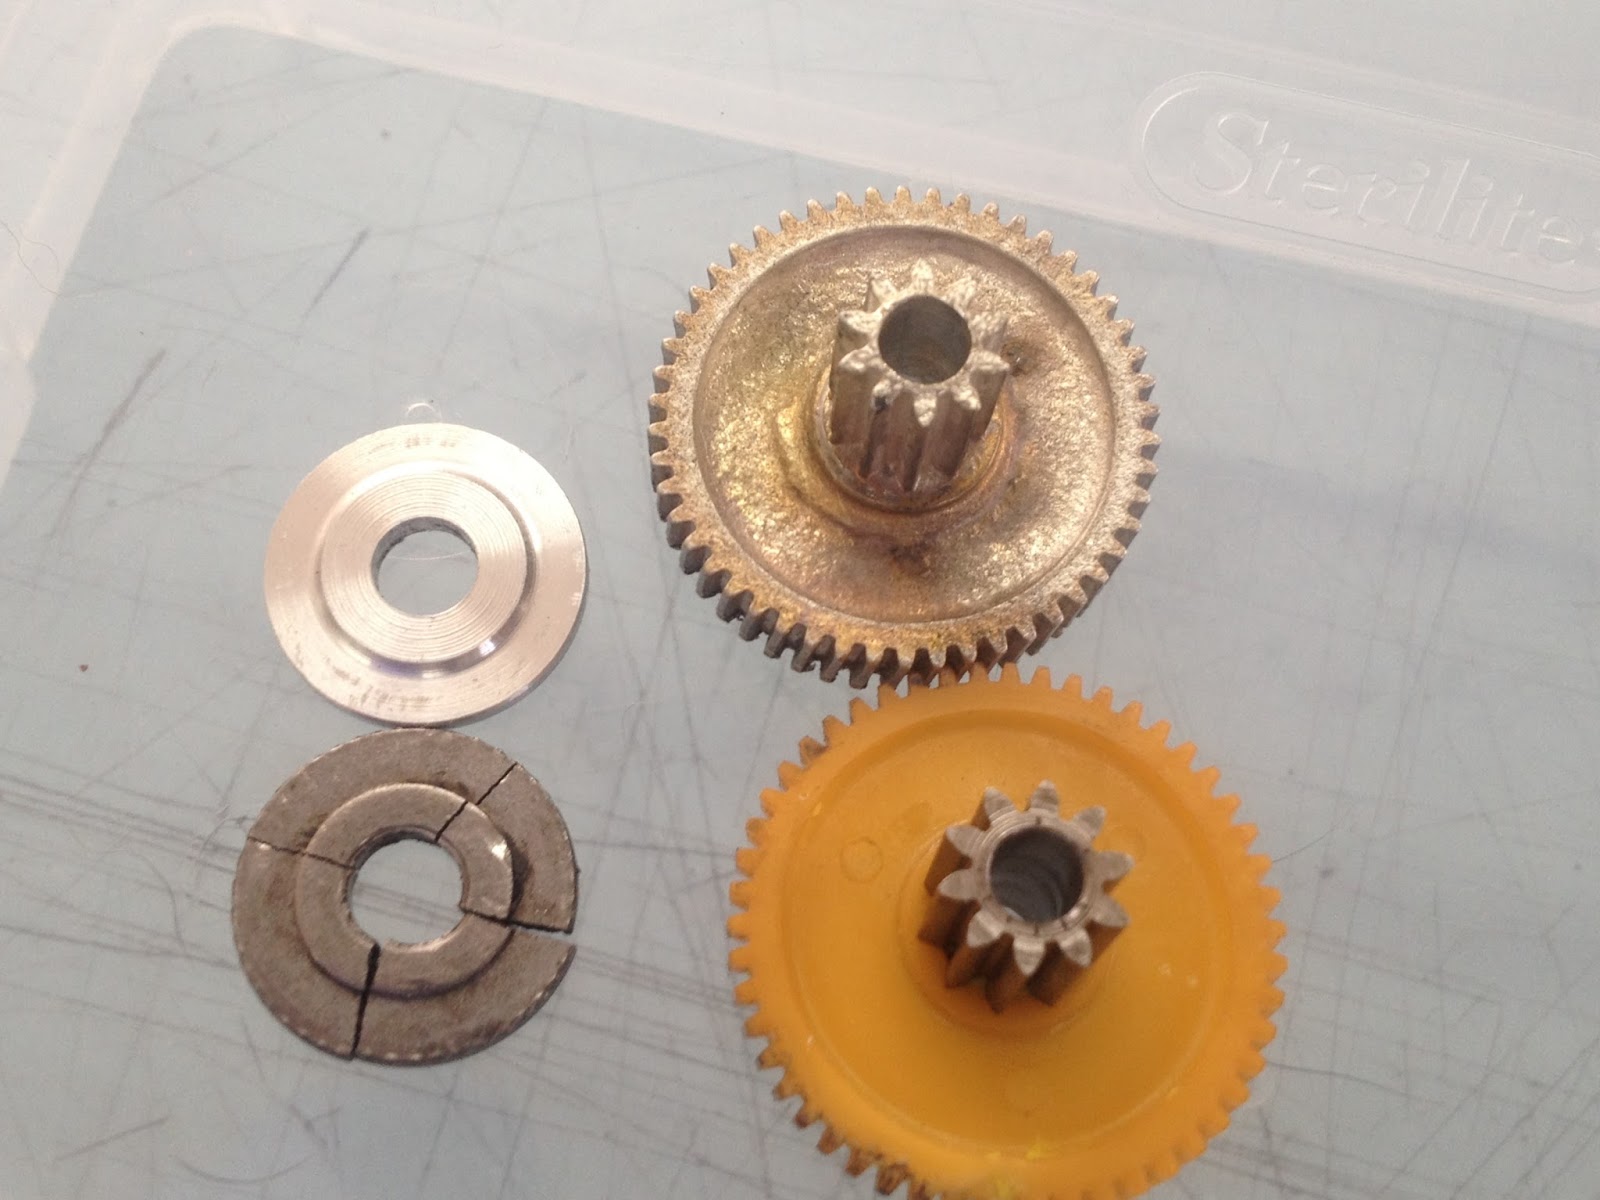
The Clutch washer got caught up in between the gears and (1) stripped the teeth off the plastic
gear. (2) broke up into 4 pieces. I could not tell you which happen first.
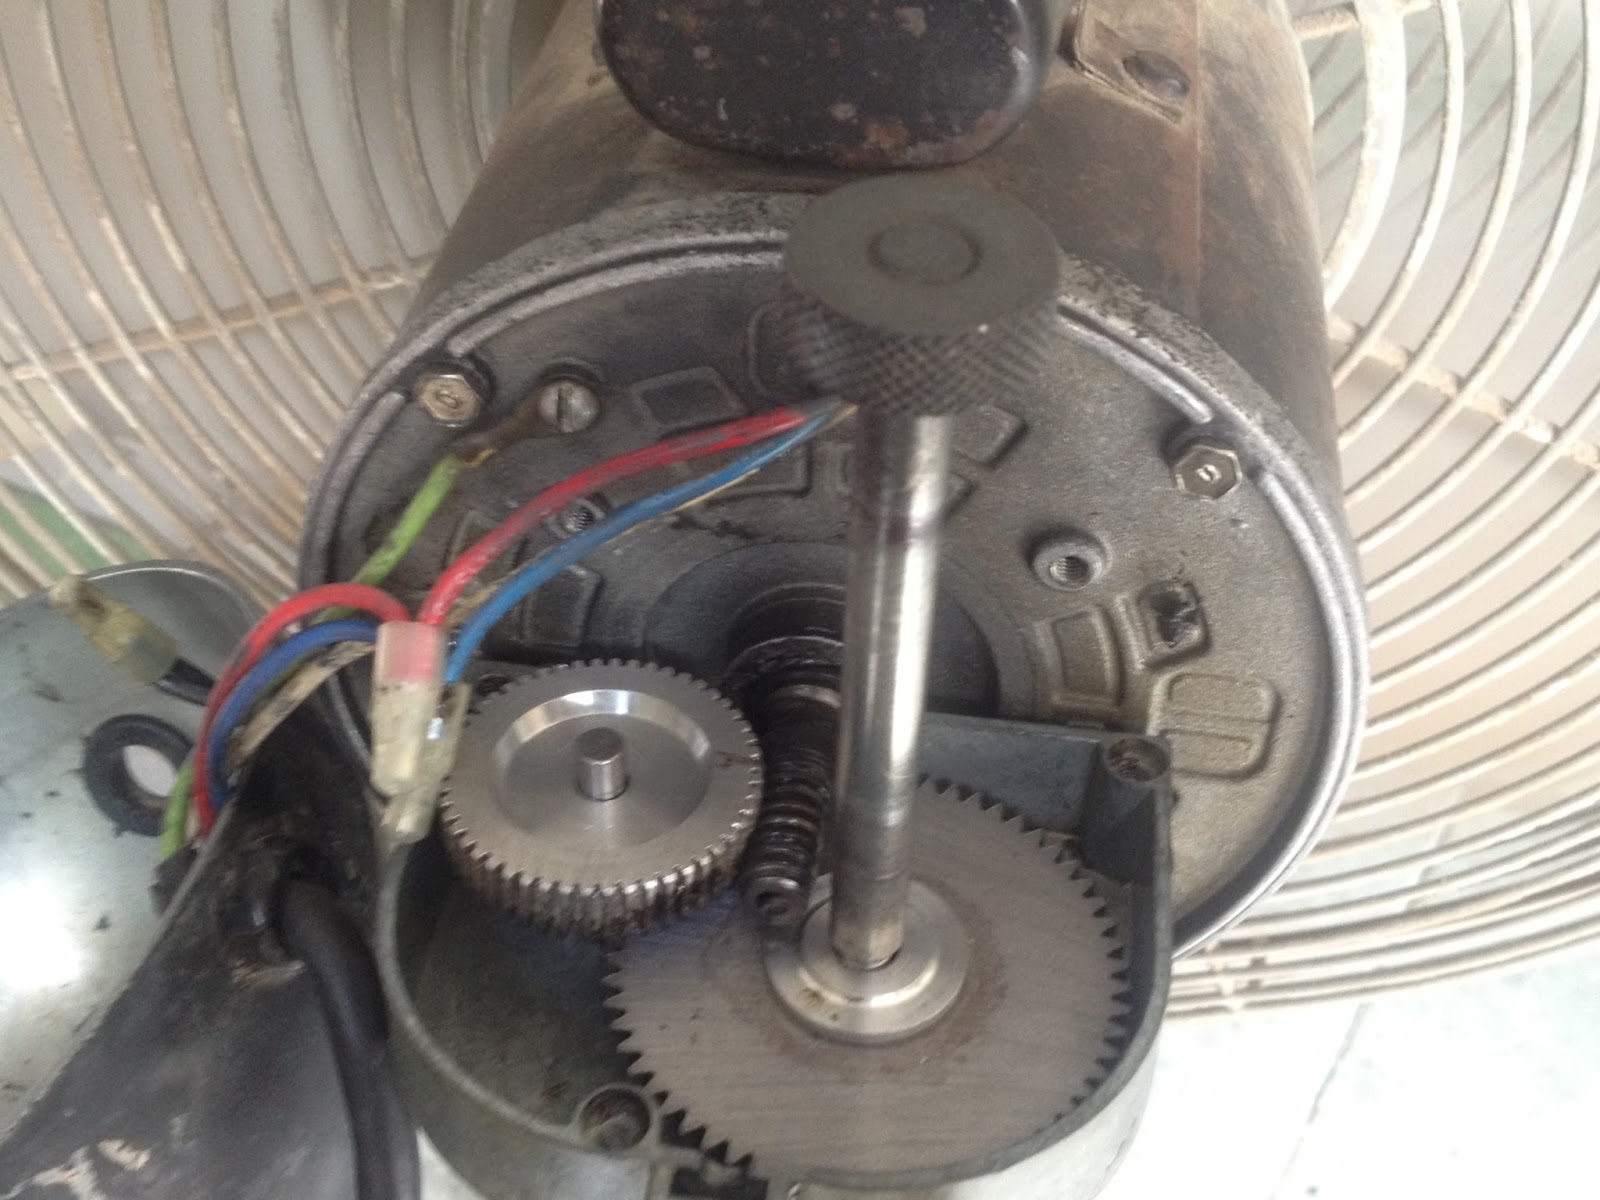
The way this fan works is. when the fan is running the gears are always in motion…(never do they disengage)
However when you tighten the vertical shaft (the one that has the knurled knob at the top)
it locks the thrust/clutch washer down to the larger lower gear and in effect “engages the oscillation”
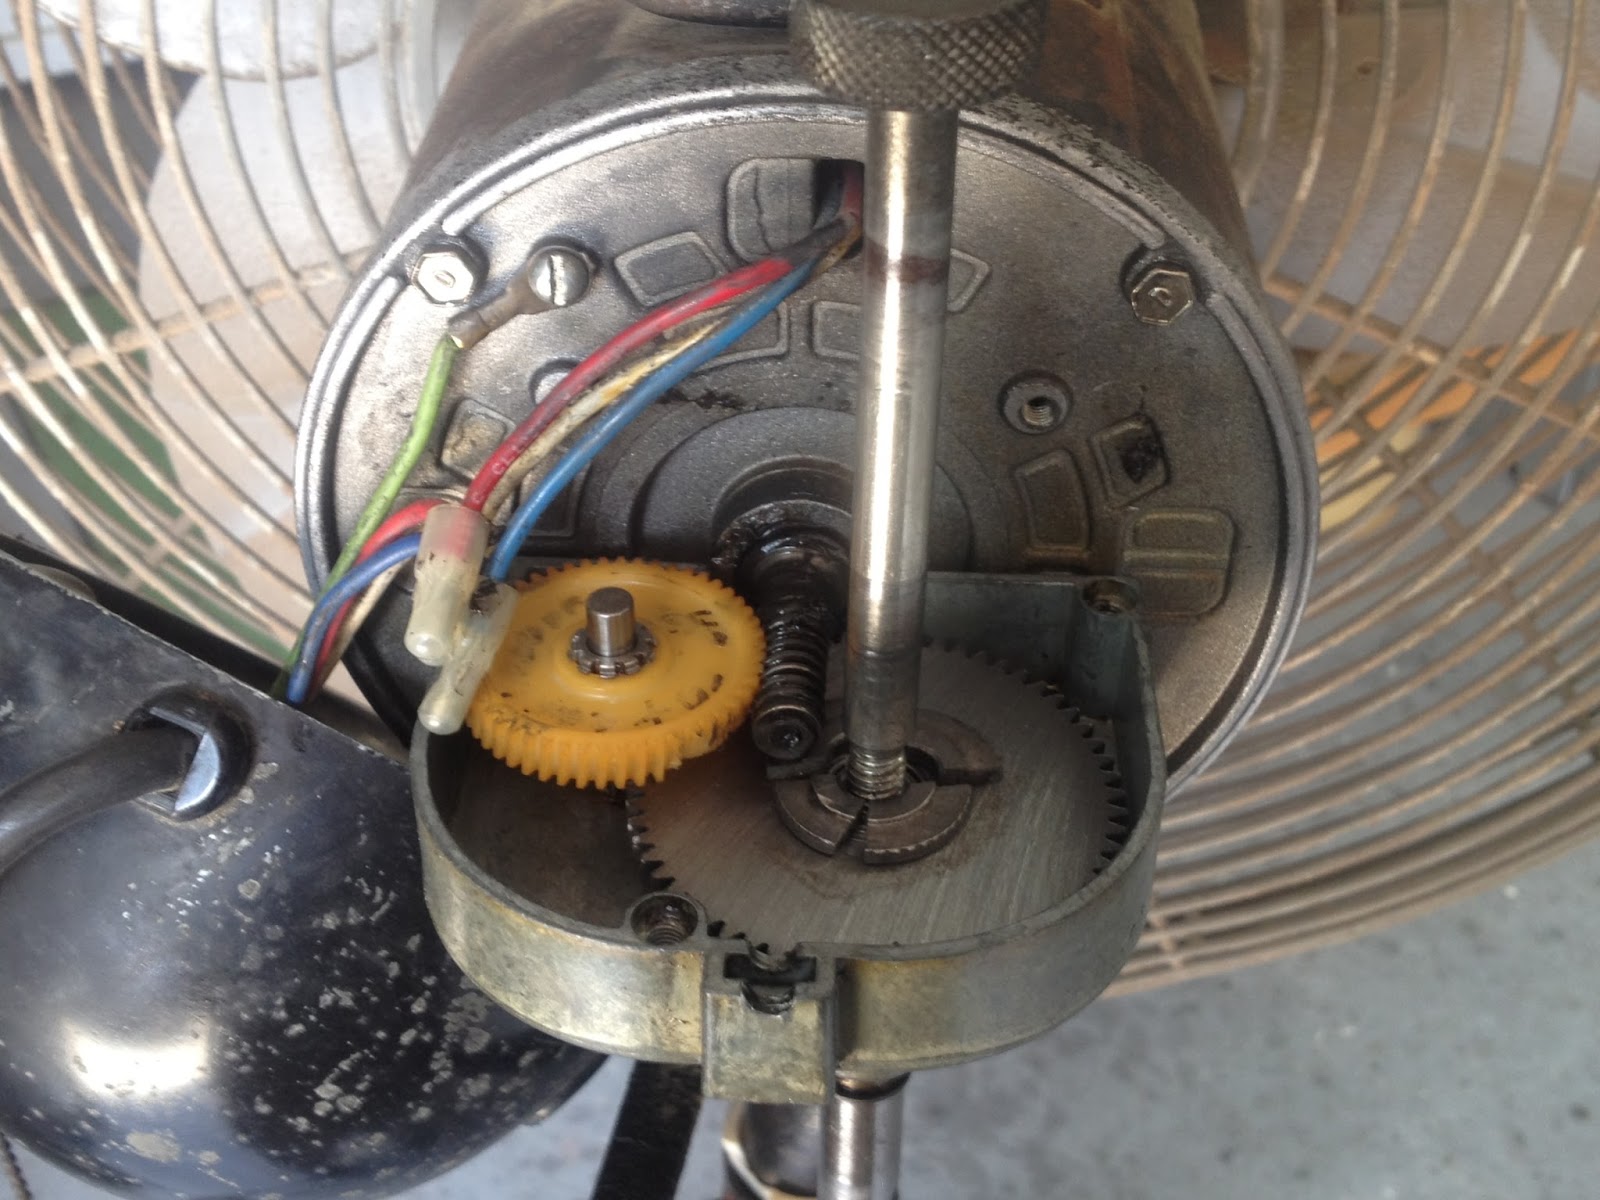
Over the years it would sometimes self tighten…. and i would pull the shaft out and fill the compartment with grease. problem would go away for some time… Ive done this perhaps 2-3 times in 25 years.
I suppose the last time I did it either the washer broke by over tightening it or When I was re installing the shaft the washer fell out of place and got caught and broke etc….
First thing See if Graingers has a replacement part….. NOPE….
consider replacing the fan… New one is now…. $900.00 NOPE…
consider replacing the motor assembly…. New one is $350.00 NOPE…
Well with a CnC machine and a lathe at my disposal I figured it was time to learn how to cut a new gear.
What I learned was theirs alot more to gears that I ever imagined.
My gear was a rack of spur gears. the larger one was cut with helical teeth.
after a few weeks of combing the net for how to and what tooling was necessary. I could see it was going to be a little more complicated that I first thought. (mostly because of the helical cut) Had the gear been straight cut that would have reduce the complexity imho.
Anyways… I thought about casting the gear. Lucky for me I have a great friend whos an expert at casting molds etc. “Craig”. After consulting he suggested it get casted out of pewter. And said a silicone mold would tolerate a few attempts to get it right. (thankfully we only need one good attempt)
So he took the failed gear home with him and made the silicone mold.
(Here are the pics and movies he shared with me.)
This gave us time to get the other required parts to complete the pour. (1) a ladle, (2) pewter
And (3)Talc powder.
(More Pics here)
After getting all the parts and the mold ready to go. we did the pour.
Our first attempt failed as the pewter refused to flow/leech into the upper teeth portion.
the Talc powder was suppose to help the metal flow.
2nd attempt. We decided the pre heat the casting mold 200f in the oven for 30 mins.
then re pour. During the pour we could see the same thing happening…..
at that very moment Craig had a brilliant idea to start pounding on the table which caused everything
to vibrate. and we could see the metal starting to fill the teeth area. after a crazy 45 seconds of pounding on the table with our fists. the cast was a success!

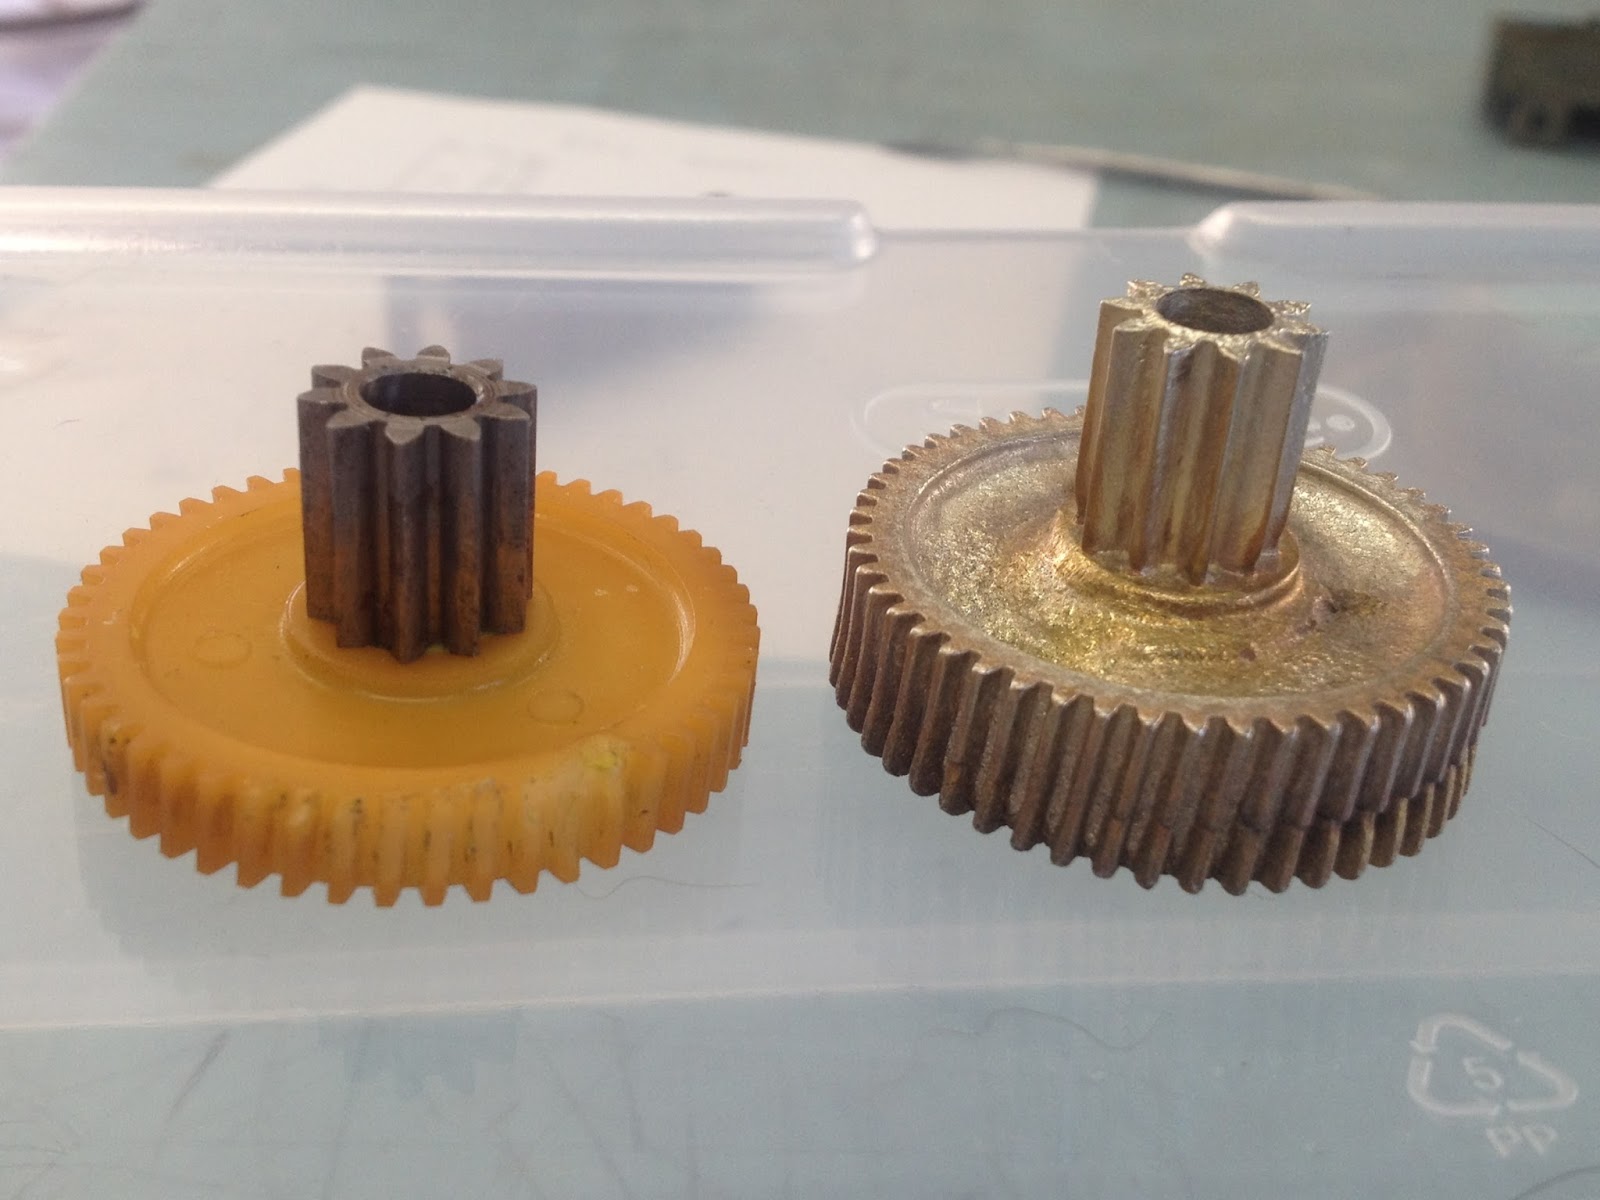


I then proceeded to machine the gear back down to size so it would fit.
I faced off one side. and then cut it down to the proper height to clear the inside boss on the case. The larger spur gear was .25 thick I did not turn it all the way back down to size other than cosmetics their just was not any reason to. I then ran a .25 drill bit down the center to clean up the inner shaft.
The gear was complete…. “YEA!”
Then it was time to make a replacement thrust/clutch washer. The factory one was made from some
cast metal? I decide an aluminum one would do just fine. I copied all the measurements. and turned one on the lathe in a few minutes.

With both parts in hand they dropped in and worked like new all on the first fitting.
I could not have been happier. And now my fan can go for another 25 years. And if the gear should fail again? I now have a mold on hand to make up another one. But dont think that will ever happen.
Here is a Movie with it action (pre full final assembly)
You can see when I tighten the shaft down the counter shaft engages and the fan starts to oscillate.
(look all the way at the bottom you can see it spinning.)
In retrospect. I do feel a small amount of failure on my part because I never seen the “I’ll cut the gear on my Mill/Lathe” procedure all the way thru. But In the end its not how you get to the end… its more important to get their any way you can. And with Craigs help thats just what happened!
Thanks Graingers for NOT having the replacement part. thus resulting in this adventure.
And BIG Thanks Craig!
Cool Breeze…
are you make anymore . i need 5 of them.
Rob,
I need to make another one. Not sure when hopefully in the next week or 2. Perhaps if your interested and need so many I’d consider selling you my mold and the materials I used to produce a part. -S
Hello. I have the same fan and it quit oscillating. I took it apart and found that my gears are fine but my washer is broke into three pieces. I curious if you made more than one washer and if you’d be willing to sell me one. As you know parts for that gearbox are pretty much non existent. Thank you.
James , Sorry for the slow reply, I have been in the process of a MOVE. In the move I regretfully Sold my Fan. As I recall I machined up a replacement washer as mine was broken too
If I had the dimensions I would have been glad to get you a replacement one. When I get my shop back up and running I can still machine one up. keep that part or perhaps send it too me for measurements.
and when the time come I can make a few of them. again sorry for the slow reply. -S